So you've got a camera you don't know how to use? Part 1 [Savannah Photography Mentor]
Hi friends! Something I have a LOT of friends, clients, and even family tell me goes something like this:
“you know, I’ve got a nice DSLR camera myself just sitting at home on a shelf with no idea how to use it! I don’t want to necessarily become a professional photographer and start my own business, but I do wish I knew how to work the camera to take better photos of myself and my family!”
Does this sound familiar? Do you have a camera just sitting around begging to be used with no clue how to start? Did you try taking some photos with it in Auto (the A or little green box icon on your dial) and were left feeling frustrated because they didn't look great? Well friends… if that’s the case, then THIS SERIES IS FOR YOU!
I decided that I would offer some 100% FREE EDUCATION just for that person (and I’ll be honest, this is aimed mostly at mommas who want better photos of their kids, but that doesn't mean non-parents or men can’t benefit from this info too!). I’ve always been a work smarter, not harder type of gal, so for some of the stuff where it’s been beaten to death all over the internet, I’m going to be linking to other blogs and resources to help you out rather than re-inventing the wheel, K? This will be done in several big “chunks” or blocks of instruction if you will. I’ve always loved teaching, and I’m an organization freak, so let me go over what I’m going to cover!
Each block of instruction I’ll have a blog post like this one here, as well as videos in the post (like this one below), to teach you how to use your own DSLR camera in manual mode! Hopefully you guys find this helpful (and don’t think I sound like a dweeb in my videos! 🤪 It was hard recording them with a toddler who wanted to be involved, so he makes a few appearances, haha! Mom life, am I right?). You can either just watch the videos first (if you’d like to just have them all in one place, you can click here for the entire playlist) and then read everything, or break it up into your own pace/chunks. And, if at the end of each lesson, you find that you have any questions, you can comment below on this blog post, or message me on social media! Be sure to follow along there as I will go live in order to try and help you learn even more! 🙌🏻
So what am I going to cover in this series!? Read on!
Julie’s Guide of How to Take Better Photos with YOUR Camera Series:
How to work your camera in manual mode! Promise, it’s not as scary as it sounds! This is what I’m covering in THIS post here!
Lighting! What to look for, and how to use it.
Composition. This will make your photos more interesting!
Focus. You’ve gotta know how to focus on the right things.
Posing and candidness for your own family. My best tips and tricks for photographing your own kiddos who are over it, as well as how to make sure you get in the pictures too!
Editing. This one could probably go on for days and days… but I’m just going to cover the basics of how to edit in the free, mobile version of Lightroom (aka no computer or fancy equipment needed).
This first lesson/post will be the LONGEST one, with the most videos, solely because this is laying the ground work for everything else I’m going to teach! You ready for this!? Let’s go! ✨
Part One: How to Work YOUR Camera in Manual Mode
Ok friends, it’s time to change the dial on your camera from AUTO (or some other mode you’ve tried out) to manual mode. But before I get ahead of myself, let me get this information out— if you don’t know what the modes are on your camera, PLEASE go read THIS first. You’ll notice over the series that I’m going to link to Coles Classroom a LOT because it’s free resources that are REALLY good for beginners!
One more plug for Cole’s Classroom (and y’all, I am NOT at ALL affiliated with them, I just really think they do a great job helping beginners understand how things work). Please read this article next so that what I’m going to teach you isn’t 100% greek, OK? Click HERE to learn your down and dirty basics to a DSLR!
Ok. So now you may guess that in order for YOU to be in control of the camera and telling it what to do, rather than it deciding for you, you SHOULD be in manual mode. Sure, aperture priority mode can be good for starting off in and practicing, but in order to have FULL control you will want to flip the dial on your camera over to M/Manual!
Before I get too ahead of myself… I shoot Canon. Every DSLR is the same BUT different. I know Nikon has different names for things, and their buttons and locations are different then what I’m used to with Canon. I probably would fumble around a bit trying to use a Nikon in manual mode, and I’d probably have to google some stuff to learn how to change settings of things on it. Also, lets say perhaps you have a mirrorless camera, this info will still apply because it’s just how to use a camera in manual mode more-so than how to work specifically a DSLR! (Side note: I could also make this crazy lengthy and talk about what the differences between DSLR and mirrorless and brands are, but I’m not gonna do that here. If that’s something you’re interested in, just google it, haha).
I also only use prime lenses. This will make more sense when you read about aperture and focal lengths, but for your purpose as a hobbyist photographer, I’m going to say, before you invest ANY money in this hobby, just use whatever lens came with your camera. If you start enjoying it or have a hundred or so extra bucks you want to spend, then most people (me included) will recommend getting the “nifty fifty” (aka a 50mm prime lens; the 1.8 is around $100-$125 and it’s pretty good for a first lens. Or you can splurge and get the 50mm f/1.4 which would be better than the 1.8 but a higher price tag) for your camera. If you’re interested in the gear I have and use, I wrote a whole post on that and that’s found HERE!
For the sake of simplicity, we’re going to be focusing on THREE main things right now and just setting and forgetting some other stuff. To learn to use manual mode, we want to make sure we understand shutter speed, aperture, and ISO, which all make up the exposure triangle. These are what I change EVERY session, day, time, shot, etc etc because they are the most important thing to getting the photo right! White balance, light metering, auto focus operation, etc. are all important but for right now we’re not going to worry about that!
The BIG THREE! (Any “This is Us” fans here? Cuz my mind just went straight to that TV show with “Big Three!”)
Exposure (aka how bright or dark your image is) is affected by three different things. There is this thing called the exposure triangle. It’s called a triangle because it’s got three sides, woo! Okay so the three sides are:
Shutter Speed
Aperture
ISO
I’m doing them in this order because this is the order of how I set my own settings on my camera before I take a photo. A few admin notes before I give you my explanation of them— the exposure triangle is NOT a math lesson. I’m a horrible mathematician haha. But, there has also been SO much written about this all over the internet, so I’m just going to give a super simple explanation, cuz who has time for all that!? If you want to read in-depth and truly try to grasp this all, then I recommend going to the following websites to learn all about the exposure triangle—
Photography Basics: Understanding the Exposure Triangle
The Exposure Triangle Beginner’s Guide
The Exposure Triangle: Understanding how Aperture, Shutter Speed, and ISO all work together
Understanding the Exposure Triangle (take a look at this article from the Pixpa blog. It offers some good info by leveraging the power of manually adjusting the shutter speed, aperture, and ISO to your advantage!)
Shutter speed, Aperture, and ISO make up the three sides of the exposure triangle. Exposure again is how bright or dark your photo is! They work together to produce an image that is properly exposed. If one variable changes, at least one of the others must also change to maintain proper exposure. I highly recommend reading this article here on correct exposure too in order to truly grasp what I’m going to explain next!
First up is Shutter speed!
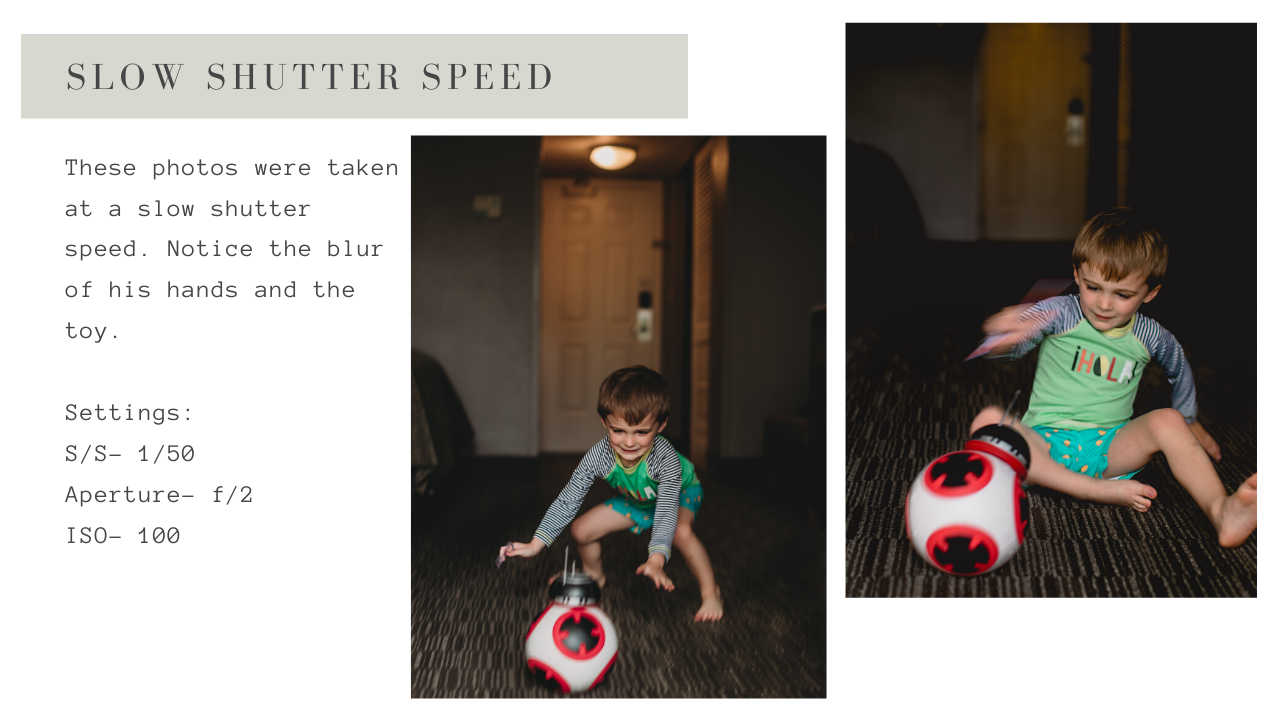
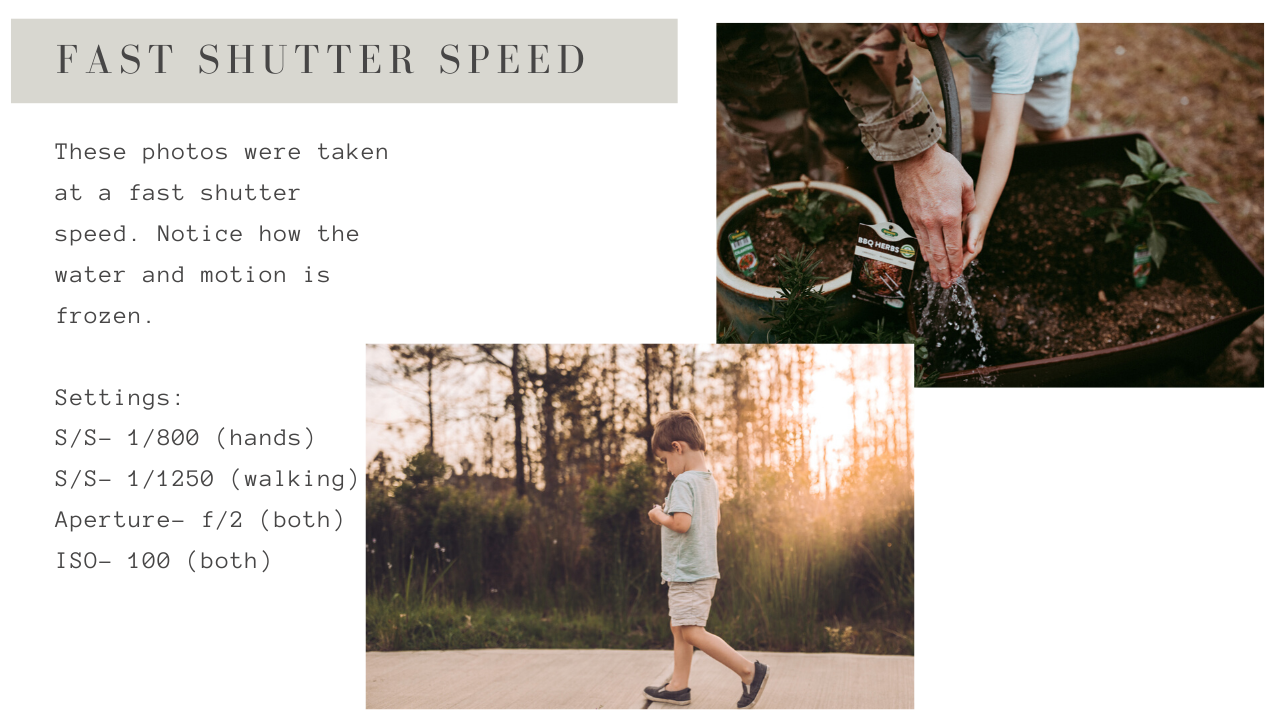
This is how long your camera’s shutter will stay open! It’s measured in seconds and is a number/fraction (i.e. 1/100). Your camera’s shutter can be open for just a short amount of time (and therefore it will NOT allow a lot of light in), or it can be open for a long amount of time (and therefore WILL allow a lot of light let in). How fast or slow your shutter is will also therefore determine how motion is recored— is it blurred or is it frozen in time? A slow shutter will allow for blur, while a fast shutter will allow for freezing of motion. Bottom line up front: Shutter speed is important for affecting your overall exposure because it determines how much light you’re allowing in and therefore how bright or dark your photo is!
Cole’s Classroom has GREAT resources to understand shutter speed!:
Shutter Speed Settings 101: The Ultimate Beginners Guide
Shutter Speed Rules
And so does creativelive.com (which has a ton of courses you can pay for on pretty much anything, especially photography! I highly recommend Jon Greengo; his class “The Photography Starter Kit” is how I taught myself to work my camera):
What is Shutter Speed?
A few notes about shutter speed (here on referred to as SS): playing with SS can be really fun to give your image the look you’re going for. There’s a general rule of thumb that your SS should be at least double the focal length of your lens. What does this mean? This means if you have a 50mm lens, your shutter speed should be at least at 1/100 (since double 50 is 100). If you’re using a zoom lens, (say like a 70-200mm) then your shutter should be at least 1/140 or faster.
*Julie’s general rule of thumb: I have shaky hands because I’m like an easily excitable puppy haha. Slower shutters will exaggerate my shaky hands, so I don’t usually shoot at 1/100, even if I have my 50mm lens on. And since I also very frequently am photographing moving children who are FAST. I rarely will have a slower shutter speed than 1/400. My only exception to this, is if I’m photographing a flat lay or an adult that will listen and not move lol, then I will sometimes drop my shutter slower to around 1/200 or so since I know my shaky hands can handle that.
Next up is Aperture! Which is that F number thing you see on your camera, aka an F Stop!
Okay remember the work harder not smarter route? Please go read this description here before you read what I’m about to write, OK? Coles Classroom’s gives a GREAT description and video of What is an F-Stop HERE!
Ok, you back? Great! Simply said, Aperture is how big of the opening of the lens is to allow light into your camera. This is NOT the same as SS (remember, the SS is how long the shutter will stay open to allow light to hit your camera sensor). Aperture, which is commanded by the F Stop number you choose, is super fun for getting your photos to look how you want them too. This is because the F Stop you chose will impact how much light is let into your camera and also will determine your depth of field.

Let’s pause for a second, k? DEPTH OF FIELD!! I could write a whole separate post and info all about Aperture and Depth of Field, and I won’t lie, there’s a LOT of math that I just would suck at trying to teach to you, so I’m going to skip over what Depth of Field is and instead link some resources. At least read the first one and scan the second so that you have a general idea of what it is, k?:
Differentiating Between Depth of Field, Bokeh, Compression: What’s the Difference?
Understanding Aperture in 3 Easy Steps
Understanding Depth of Field: A Beginners Guide
What You Need to Know About Depth of Field
Since aperture affects your depth of field, this will be the number one way you can be in control and make your photos look more pro-like. You know how the iPhones have portrait mode? Well those portrait modes blur out the background right? This is because aperture can give you the blurry background (aka bokeh) because it has a shallow depth of field. Simply stated, a lower number F-stop (like 1.8, 2, etc) means you’re shooting your lens WIDE OPEN and at a large aperture (I know, that part is confusing, sorry, it’s just the terminology), where the higher number F-Stop means you’re shooting your lens CLOSED UP and have a smaller aperture.
Maybe this will explain that a bit more if you’re feeling confused still!

A few notes about aperture: depending on whatever lens you’re using (and my guess it it’s probably whatever came with your camera, affectionally known as a “kit lens”, since you probably got it in a kit!), your aperture may be limited. Zoom lenses (ones that can go on a range of different focal distances, like 18-55, 70-200, etc) have less of an aperture range than a prime lens (a fixed focal length, like a 50mm for example). If you are shooting WIDE OPEN, aka as large of aperture as your lens will allow (and the lowest numerical value your lens allows), then you will have less in focus; SO, if you’re taking a photo of say four people, unless they are perfectly lined up side by side, your photo will likely not have everyone in focus.
*Julie’s general rule of thumb: I shoot pretty wide open. I rarely will close up my lens. Each lens I have has it’s own “sweet spot” so to speak. Remember, I also only own fixed length/prime lenses and my gear is top notch and basically the best version of the lens that Canon makes (aka high price tag too), and therefore I can open my lens to a F stop of 1.2 on two of my lenses, and 1.4 on everything else. Your lens may only allow you to open up to a F stop of 3.5, and THAT’S OK! I personally like to shoot around f/1.6-2.2 for my sessions, but it really just depends on the lighting and scenario. * Remember— I have shaky hands and like my shutter speed to be 1/400 or faster, so I often will need that large, wide open aperture to allow me to have more lighting!
So what should YOU do? Coles Classroom gives some ideal settings to use for the type of photos you may be taking in the above linked resources. I recommend playing around with all different apertures to see what you like the look of!
LAST PART, YAY! What in the HECK is an ISO!?
When I took my first photography course, it was a Groupon special 4 hour in person lecture and somewhere in there I picked up this saying for the acronym of ISO and what it stands for: “Is the Sun Out.” This isn’t really what it stands for (its actually “International Standards Organization”), but it’s a good way to think about ISO generally speaking! Is the sun out? If yes, you probably don’t need a higher number ISO. Is the sun hiding and not out? If so, then you will need a higher number ISO to help the overall exposure of your image. A high number ISO will make your photo “NOISY.” You may not care about this right now, or ever honestly, but it’s an important factor to the image because more noise IS noticeable! Read on to learn more because I’m not going to drone on about this, so just check these resources out to understand ISO better:
What is ISO? Understanding ISO for Beginners
My goal for you is that you’re aiming for an EVENLY EXPOSED PHOTO STRAIGHT OUT OF CAMERA (SOOC for short)! In the examples you’ll see me sharing next, you’ll notice that I’m not always evenly exposed SOOC. This is for two reasons—I tend to always underexpose a bit because I’m going to edit my photos and that’s my preference with editing. You can always save a photo that’s a bit underexposed, but you can’t really save anything when it’s OVER exposed! When something is TOO bright and over-exposed, the highlights will be “blown out” and all the details will be lost. When in doubt, err on the side of caution and underexpose a bit, and then when we get to editing (the last session!) you can fix your exposure if needed.

A few notes about ISO: you could play with the AUTO ISO feature on your camera for a bit to figure out how this all works. Once you see how a low or high ISO number affects your exposure, move from auto to setting it yourself. This part is important so listen up— YOUR CAMERA will dictate how well it can do with a higher ISO. Each camera has it’s own base ISO and more expensive, high end top model camera will do better with the noise of ISO then an entry level beginner camera.

*Julie’s general rule of thumb: When I’m outside shooting in the beautiful golden hour lighting, I’m always around 100 for ISO. I try not to go over 400 when I’m outdoors for golden hour (and I rarely have to because I shoot wide open). When I’m inside or it’s yucky outside or just plain dark….I raise my ISO! Like in the example above, Theo is sitting in a very dark hallway with NO natural lighting anywhere. I raised my ISO, and then slowed my shutter down to allow in some more light so that I didn’t have to raise my ISO to 6400 because then the photo would have been impossibly grainy! Again, I generally like to be shutter speed 1/400 or faster, and usually, instead of dropping my shutter slower to allow more light, I will just raise my ISO to have more even overall exposure. This is ALWAYS the last setting I set before I take a photo, and it’s something I adjust quite frequently when I’m shooting and moving around with different lighting.
PHEW! Are you exhausted from me, cuz I sure am, and friends we’re only just scratching the surface of everything with this! So now we’re like, ALMOST ready to take a photo finally! 😂
Just a note for your purposes…when you half press on the shutter button while looking through your view finder (or if you’ve got a mirrorless camera and your looking at your viewfinder- which is just crazy to me haha), you’ll notice some brackets with boxes lighting up to show what the camera is picking up to be in focus (which we’re not messing with, YET!), and you’ll also see a line with tick marks on it and numbers like -3, -2, -1, 1, 2, 3. This is your exposure composition and we’re not going in-depth on this (it was covered at the beginning in an article I shared, so refer back to there if ya need too). For YOUR purposes only, aim to have your moving tick mark right on the money in the middle and not near -1 or 1, ok?

The evenly exposed images above are what YOU are aiming for. The unevenly exposed (aka too dark or too bright) images below are not what you want to be getting SOOC. Remember to focus your camera on your subject and watch for the “tick mark” to hit in the middle on the money— this will mean the subject you’re focusing on is evenly exposed like you want!

Now… I’m going to give you some homework before our next lesson, but it’s fun I promise! Here’s your LAST video for this lesson to wrap up exposure and working your camera in manual mode!
It’s your turn to now:
Flip your dial to manual mode on your camera.
Here are some general settings to just set and forget on your camera (you may have to google your model and how to change these):
-set your white balance to AUTO
-picture style to AUTO
-AF operation (aka auto focus mode) put this to AISERVO (Canon users only; it’s called something else for Nikon) if you’re going to practice on a moving target (ahem, a child) or one shot if you’re going to practice on a stationary object
-image quality can be set to JPEG unless you want to edit the photos on your laptop in a professional editing software such as Lightroom or photoshop; in which case shoot RAW. For our purposes, you’re going to edit in the free mobile Lightroom app on your phone so just do JPEG. Plus the file sizes are smaller! 🙌🏻)
-don’t mess with how you will choose your focus and instead just use whatever your camera default is. We’re going to change all this in a later lesson. 😘Get ready, get set….. GO! Start practicing and taking all the photos of all the things! Experiment with different shutter speeds, apertures, and ISO values! Learn how to change them quickly (again, moving kiddos mean they will change their location and therefore their lighting a lot and you’ll be adjusting a lot!). Your goal right now is to get an EVENLY EXPOSED PHOTO (I.e. not too bright and not too dark but juuuuuust right).
If you’ve got questions or just want to shout out that you’re following along and on this journey, drop a comment below or send me a DM on Instagram! I can’t wait to see what y’all learn from this little series!